
Sentaurus Workbench
8. Parameter and Variable References
8.1 Project Parameters
8.2 Project Variables
Objectives
- To provide deeper insight into the parameters and variables of Sentaurus Workbench.
8.1 Project Parameters
As mentioned in Section 4.1 Adding Parameters, a parameter splits the flow at the insertion point to produce variations in the current tool inputs. To refer to a parameter, the parameter name must be placed inside a pair of @ signs.
To demonstrate the possible ways to access parameter values, the following entries have been put into the Sentaurus Visual tool input file (tool3) from the project Applications_Library/GettingStarted/swb/node_preprocess, shown in Figure 1:
@param1@
@param2@
@param3:+2@
@param2|-1:+2@
@param1:all@
@param1|-2:all@
Click to view the command file tool3_vis.tcl.
You can easily compare the preprocessed file with the command file, by selecting the node of interest, clicking the Visualize Results button and selecting Compare Command Files of Selected Nodes.
The following examples show how the corresponding preprocessed entries for the first (upper) node in the column look after preprocessing:
| Command entry | Result after preprocessing |
|---|---|
| @param1@ | 1 |
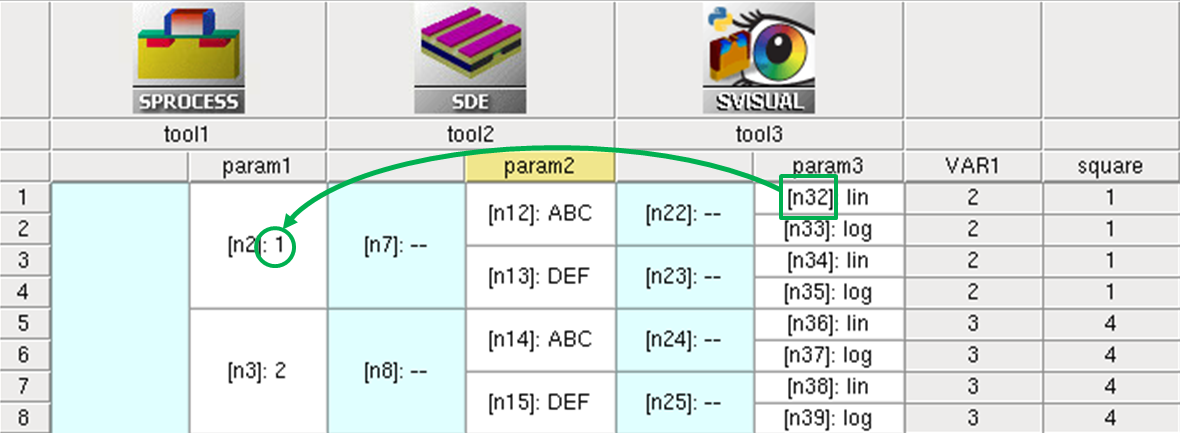
Figure 1. Reference by parameter name. (Click image for full-size view.)
| Command entry | Result after preprocessing |
|---|---|
| @param2@ | ABC |
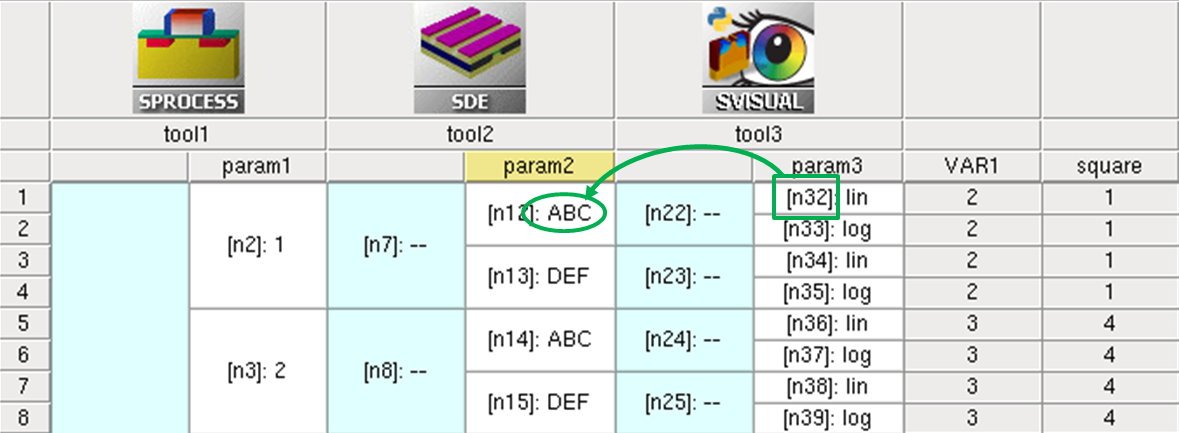
Figure 2. Reference by parameter name. (Click image for full-size view.)
| Command entry | Result after preprocessing |
|---|---|
| @param3:+2@ | lin |
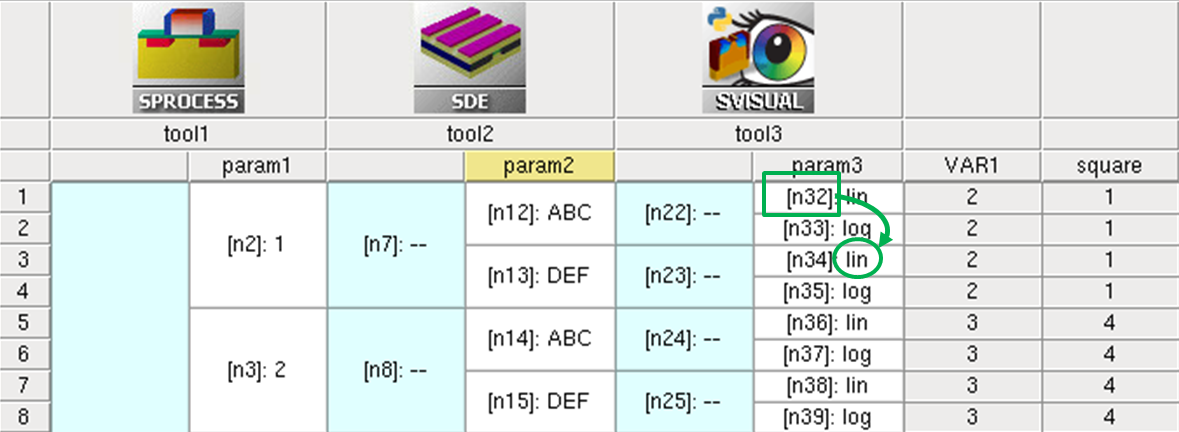
Figure 3. Combination of reference by parameter name and vertical node shift. (Click image for full-size view.)
| Command entry | Result after preprocessing |
|---|---|
| @param2|-1:+2@ or @param2|:+2@ |
ABC |
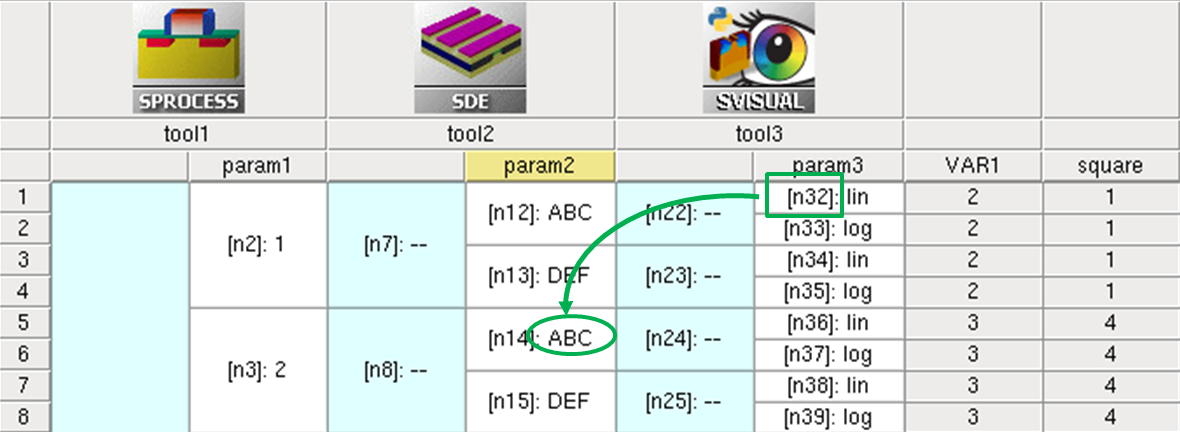
Figure 4. Combination of reference by parameter name, and vertical and horizontal node shifts. (Click image for full-size view.)
| Command entry | Result after preprocessing |
|---|---|
| @param1:all@ | 1 1 1 1 2 2 2 2 3 3 3 3 4 4 4 4 5 5 5 5 |
| @param1|-2:all@ | 1 2 3 4 5 |
Note that the @param1:all@ entry in the Sentaurus Visual tool instance produces the multiple-value param1 list according to the number of subsequent splits in the Family Tree. To produce the original list of values, the command should refer to the project tool location where the parameter has been introduced (Sentaurus Process tool instance). Alternatively, the list of values produced by @param1:all@ can be reduced to unique entries and sorted using the Tcl lsort command:
!(
puts [lsort -unique [list @param1:all@]]
)!
8.2 Project Variables
Variables are special objects, introduced in Sentaurus Workbench, which are used to exchange data values between project tools. These can be values that are known before project execution, for example, an user-defined implantation dose, as well as values that are extracted during runtime of a tool, for example, an oxidation thickness.
Like a parameter, a variable holds a value and can be referenced in any form of the @...@ references. The main difference is that a variable does not create a split in the simulation flow and, therefore, does not change the simulation tree representation.
Variables are displayed on the right-hand side of the Project tab under Variable Values (see Figure 5). If you do not see Variable Values, then press the F4 key.
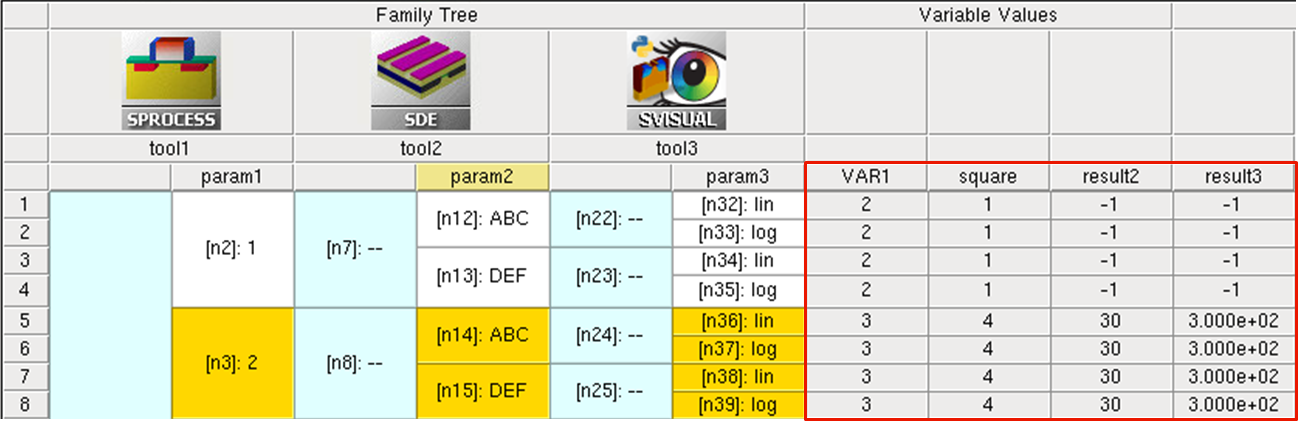
Figure 5. Variables shown on Project tab. (Click image for full-size view.)
8.2.1 User-Defined Variables
To create a variable at a certain position in your simulation flow, you initialize it by inserting #set into the command file. For example:
#set VAR 2
Sentaurus Workbench then creates the variable and initializes it during preprocessing.
In this project, the variable @VAR1@ is given the current node number assigned in the first Sentaurus Process tool instance:
#set VAR1 @node@
Click to view the command file tool1_fps.cmd.
After project preprocessing, it appears as a single column in the result table following the last tool in the project tool flow (see Figure 5, VAR1 column under Variable Values).
You can also use a parameter or previously defined variables in the equation expression and assign a resulting value to the variable, which then appears in the result table. For example, in the Sentaurus Structure Editor command file tool2, the second statement is:
#set square @<param1*param1>@
Click to view the command file tool2_dvs.cmd.
The #set command here creates the variable @square@ and assigns the square of @param1@ to it. The resulting variable value again appears in the result table (see Figure 5, square column under Variable Values).
To prevent a variable from appearing in the result table, instead of #set, you can use its hidden variant, the #seth command. For example, the variable @result1@ in tool1:
#seth result1 -1
as well as @VAR2 in tool2:
#seth VAR2 @node@
are both hidden and, therefore, do not appear in the result table. This helps to save the view space if there are many variables in the project. You can still check the existence and value of a hidden variable in the Node Explorer (see Figure 6):
- Right-click a node and choose Node Explorer (or select a node and press the F7 key).
- Click the Node Data tab (you might need to select Include Parent Nodes).
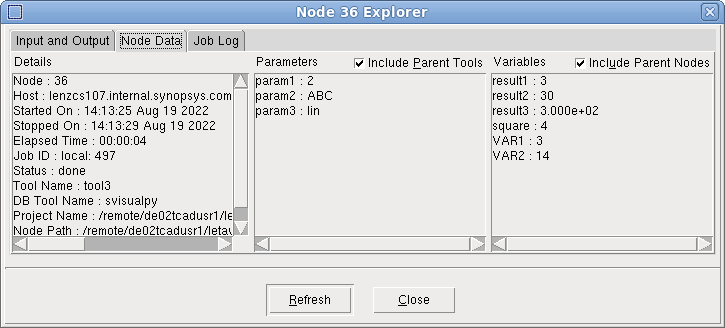
Figure 6. Hidden variable values shown in Node Explorer. (Click image for full-size view.)
8.2.2 Extracted Variables During Runtime
So far, the discussion has concerned data that was well defined before runtime. However, often data is known only at runtime, for example, the final thickness of a grown oxide layer. In this case, you can still use the variable concept as discussed in the previous section to exchange data between different tools. How this is achieved is demonstrated in this section.
During simulation, each tool writes log information to its *.out file. After a node has been executed successfully, Sentaurus Workbench parses the output file of the node for strings that match the following template:
DOE: <variable name> <value>
and updates the result table accordingly. If a specified variable already exists, then the last printed value overwrites an existing one.
Therefore, writing values following the DOE format to the *.out file of a tool is the way to create variables and how extracted parameter values are sent to the project to be exchanged between project nodes and used for further analysis.
The following examples show, for different Sentaurus tools, how you can write a variable to have it appear in the result table:
- For all Tcl-based tools (Sentaurus Process, Sentaurus Interconnect,
Sentaurus Visual, and Sentaurus Device in Tcl mode), use:
set pi 3.141593
puts "DOE: PI $pi" - For all Python-based tools (Sentaurus Visual Python and Sentaurus Device in
Python mode), use:
pi = 3.141593
print(f'DOE: PI {pi}') - For Sentaurus Structure Editor, use:
(define pi 3.141593)
(sde:ft_scalar "PI" pi)
As extracted variables exist only after the tool was run, subsequent tools using the extracted variable in preprocessing statements might fail during preprocessing. To avoid preprocessing errors of the clean project, it is good practice to initialize every extraction variable with a #set or #seth command beforehand, depending on whether or not the extracted value should appear in the result table.
Consider a few examples in the project node_preprocess.
In tool1, you extract a hidden variable @result1@ during runtime and assign the current node number multiplied by 10 to it:
#seth result1 -1
set mynode [expr 10*@node@]
puts "DOE: result1 $mynode"
You can check its value in the Node Explorer (see Figure 6).
In tool2, you extract a visible variable @result2@ during runtime and assign the value of @result1@ multiplied by 10 to it:
#set result2 -1
(define xvar (* 10 @result1@))
(sde:ft_scalar "result2" xvar)
You can check its value in the result table column result2 (see Figure 5).
In tool3, you extract a visible variable @result3@ during runtime and assign the value of @result2@ multiplied by 10 to it:
#set result3 -1
xvar = 10*@result2@
print(f'DOE: result3 {xvar:.3e}')
You can check its value in the result table column result3 (see Figure 5).
In addition note that, when you first preprocess the cleaned project, the result variables @result2@ and @result3@ take their initialization value of -1. Only when the corresponding tools are run do they take their final values of 10x and 100x, the node number of tool1, respectively.
A variable reference creates an execution dependency from the node where the reference is performed to the first ancestor where the variable has been set.
Copyright © 2022 Synopsys, Inc. All rights reserved.